
PART 1: Why does your base matter?
The base of your makeup is the like the foundation of a house, your makeup will never look good if your base isn’t strong. The base consists of skin prep, primer, foundation/skin tint/, concealer, bronzer, blush, setting spray, and powder.
PART 2: Skin Prep + Primer
The first part of the base is skin prep. I don’t do a lot personally, some sort of moisturizer is good. The type of primer should correspond to your skin type. If you have oily skin, use a matte primer to absorb excess oil, if you have dryer skin use a moisturizing primer so you don’t end up with dry looking skin.
PART 3: Foundation or Skin Tint
After your skin prep and primer have absorbed its time for either a foundation or a skin tint if you want a more natural look. Foundations range from low to full coverage, If you’re a beginner I recommend a lower coverage foundation or skin tint as the fuller coverage can easily look cakey. For shade matching, match your foundation to your neck. I personally use the ELF Halo Glow as my foundation. You can use either a brush or a beauty blender, I don’t really notice much of a difference.
PART 4: Concealer
After foundation I use concealer, mainly focusing on my under eyes, as well as spot concealing any acne. I like to do a concealer placement like this one.
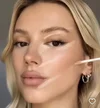
I like to blend with a brush and then a beauty blender.
PART 5: Blush and Bronzer
I first use a liquid blush on my cheekbones and blend the blush under my eye a bit to give a glow from within look. Then I use a powder bronzer on my forehead and on top of the blush, blending them together. After that i use a bit of powder blush on top. This is how I like to do it but I recommend looking into blush and bronzer placement for your face shape as well as desired look.
PART 6: Setting
Arguably the most important part of the base is how you set it. First begin with using a setting spray, I use the face glue setting spray from nyx. Then go in with a setting powder, you can use either loose or pressed, I use loose but I recommend pressed if you’re a beginner. Make sure that you aren’t putting too much powder on the puff, I like to pat it on the top of my hand before putting it on my face. Apply powder everywhere you put your concealer as well as your T-zone or any areas prone to getting oily. Finally, set your face with spray again to ensure everything stays all day. This is typically enough to last most of if not the whole day.
THE END! Hope you found this helpful if you have any questions please ask!
The base of your makeup is the like the foundation of a house, your makeup will never look good if your base isn’t strong. The base consists of skin prep, primer, foundation/skin tint/, concealer, bronzer, blush, setting spray, and powder.
PART 2: Skin Prep + Primer
The first part of the base is skin prep. I don’t do a lot personally, some sort of moisturizer is good. The type of primer should correspond to your skin type. If you have oily skin, use a matte primer to absorb excess oil, if you have dryer skin use a moisturizing primer so you don’t end up with dry looking skin.
PART 3: Foundation or Skin Tint
After your skin prep and primer have absorbed its time for either a foundation or a skin tint if you want a more natural look. Foundations range from low to full coverage, If you’re a beginner I recommend a lower coverage foundation or skin tint as the fuller coverage can easily look cakey. For shade matching, match your foundation to your neck. I personally use the ELF Halo Glow as my foundation. You can use either a brush or a beauty blender, I don’t really notice much of a difference.
PART 4: Concealer
After foundation I use concealer, mainly focusing on my under eyes, as well as spot concealing any acne. I like to do a concealer placement like this one.
I like to blend with a brush and then a beauty blender.
PART 5: Blush and Bronzer
I first use a liquid blush on my cheekbones and blend the blush under my eye a bit to give a glow from within look. Then I use a powder bronzer on my forehead and on top of the blush, blending them together. After that i use a bit of powder blush on top. This is how I like to do it but I recommend looking into blush and bronzer placement for your face shape as well as desired look.
PART 6: Setting
Arguably the most important part of the base is how you set it. First begin with using a setting spray, I use the face glue setting spray from nyx. Then go in with a setting powder, you can use either loose or pressed, I use loose but I recommend pressed if you’re a beginner. Make sure that you aren’t putting too much powder on the puff, I like to pat it on the top of my hand before putting it on my face. Apply powder everywhere you put your concealer as well as your T-zone or any areas prone to getting oily. Finally, set your face with spray again to ensure everything stays all day. This is typically enough to last most of if not the whole day.
THE END! Hope you found this helpful if you have any questions please ask!


