- Staff
- #1
Section 1: Chewing
If you want jaw gains, Theres 3 things I can recommend for chewing. Those 3 things are mastic, falim and chisell. I’ll go into depth.
Part 1: Falim
Falim is a gum that has a bland, gas station gum like taste. The texture of it is smooth. When you chew on it, it’s hard but too hard for a beginner. Its also cheap. If you want to get into chewing, falim is a great place to start.
Part 2: Mastic
Mastic is a gum that looks like crystals when you take it out of the box for the first time. You have to chew down on them a little bit to turn it into gum.
once it’s been turned into gum, it has a texture that looks exactly like falim. The hardness of the gum is more than falim imo. The taste is also very different. The taste of falim is bland, the taste of mastic is very “earthy”.
Some users here have said that it tastes like dirt. In my experience, it tastes terrible and leaves a bad taste in your mouth after chewing. So if you can’t tolerate gum tasting bad, mastic isn’t for you. I also wouldn’t recommend mastic for chewing beginners, it’s very hard and can wear your jaw out easily.
Part 3: Chisell
Chisell is chewable silicone that is shaped like a small rectangle. The hardness of chisell varies. It comes in 3 versions, which are “light bite”, “medium bite” and “tough bite”.
I’ve bought all 3. The one you buy depends on how long you’ve been chewing. If you’re a beginner, buy the light bite. If you have some experience with chewing, get the medium or tough bite.
Chisell is not meant to be the only thing you chew either. It’s complementary. If you only chew Chisell, you will wear it down quickly and put holes through it, which renders it useless.
How to chew:
Part 1: Chewing with mastic and falim
Where you chew with mastic and falim is less important. You can chew on your molars, premolars, canines and so on. You will still get gains. You should ideally be chewing with an UP AND DOWN motion.
The length you chew falim or mastic should not exceed 2 hours a day. Or 1 hour a day if you’re combining mastic/falim with another jaw building method like chisell.
If you chew for too long, you will wear down your teeth and put yourself at risk for TMJ. You do NOT WANT TMJ. TMJ will force you to give up chewing.
Part 2: Chewing with chisell
Chisell should ONLY be chewed on your molars. NO EXCEPTIONS. If you chew it on your premolars or canines, you will put holes into your chisell quick, which will end up in it being useless and unchewable. This isn’t just my opinion either. It’s literally in the chisell manual.
and what to expect:
After chewing for 5 months to a year, you can expect a significantly more defined/widened jaw due to a bigger masseter muscle.
Your masseter muscle isn’t the only thing that can be benefited from chewing. Other regions of your face can also see changes. Examples are your zygomatic arch and your ramus. I don’t want to go too much into detail, so I’ll just link threads and articles that explain or detail this.
Here are some examples of people who chew maxxed


Bloat:
This section won’t be long because it’s simple.
Chewing will look like shit if you’re bloated. Lose weight and cut BF if you want your chewing to make your face look defined.
Section 2: beard frauding
not really improving the jaw but can 10 times make your jaw better
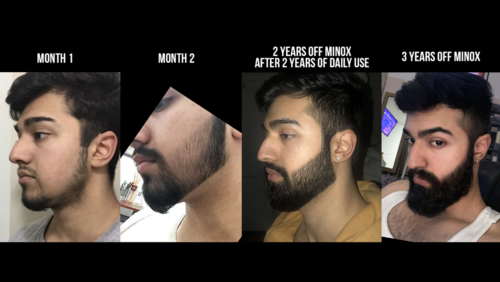
taking care of your beard:
Keep your beard soft and healthy by conditioning it regularly with beard oil. This lightweight product moisturizes the skin underneath your facial hair to prevent itchiness, control flakes, and maintain follicle health.
How to Use Beard Oil
1. Pour a few drops (less is more) into the palm of your hand and spread it evenly between both hands.
2. Massage the oil into the base of your beard (it can be dry or damp for this step, but should not be wet).
3. Work your hands through your beard until you’ve reached the hair tips. Spread the oil evenly over your entire beard and the underlying skin.
Section 3: Mewing
self explanatory
As we all know leanmaxing is one of the very few softmax methods that will significantly raise your psl but there's way too much inaccuracy and misinformation on this site and others about how to do this optimally whilst ensuring you don't ruin your metabolism, lose lean tissue and waste valuable time that could be spent looksmaxing on fad diets that end up becoming a looksmin. In this guide I will outline the fundamentals of fat loss, the science behind the small details as well as other little methods that will help you to optimally leanmax after you get to the golden range of 12-10%. Being high body fat 25%+ is a complete looksmin that lowers testosterone levels, causes skin issues like acne and hides your potential bone structure. Remember if you're not leanmaxing you're not looksmaxing.
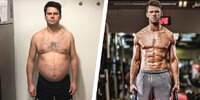
CICO (Calories in calories out)-
This is the base rule of fat loss, calories in, calories out. Your body requires a certain number of calories (maintenance calories) to maintain its current weight, if you eat significantly more/less calories than your maintenance calories you will gain/lose weight. This number is comprised of your BMR (basal metabolic rate) (the calories your body burns doing nothing) multiplied by your activity multiplier (the calories your body burns while active). As a general rule of thumb you want to subtract 500 calories from your maintenance calories. This is because there are 3500 calories in 1lb/0.5kg of fat, therefore consuming 500 calories below your maintenance calories ensures you lose at least 1lb/0.5kg per week from solely dieting (500x7=3500). You can increase or decrease this deficit depending on how fast you want to lose weight and what your current weight is as well as doing exercise. To find out your maintenance calories you can use this online calculator to estimate your maintenance calories. Maintenance Calculator (you may have to +/- calories as its not an exact science)
Preserving Lean Tissue-
CICO essentially means that you can eat whatever you want as long as it is below your maintenance calories and still lose weight but not all of it is just fat if you do this. Which is how people use this method and then become fat again from eating low volume high calorie foods (fast food) or extremely skinny because they don't get enough protein and micronutrients and end up looking like this by losing all their muscle mass/lean tissue.
In order to preserve lean tissue, clinical data provided by Eric Helms et al shows that losing more than 1% of your weight significantly increases your risk of losing muscle. For example a 200lbs/91kg male should not lose more than 2lbs/1kg per week in order to retain lean tissue optimally likewise a 300lbs/136kg male should aim to lose a maximum of 3lbs/1.3kg. That being said the higher in body fat you are the less risk there is of losing muscle when dieting aggressively and vice versa with people with lower levels of body fat which is why you should slow down when reaching 20% body fat. Dieting with high deficits however like 800cals or above is a one way stop to ruining your metabolism and in conjunction your leanmaxing journey. The metabolism eventually adjusts to a point where the calories you're eating to lose weight become the calories needed to maintain your weight which is why once you stop losing weight on those calories you decrease them per usual. However if you decrease your calories significantly each time what ends up happening is you'll have to diet on 1200 calories (example) just to lose weight while the person who kept their deficit at a modest 500 calories and slowly decreased is dieting and losing weight on double that. There is one brutal truth to metabolism that depends on genetics which is that the metabolism of some people is higher than others due to genetics and other factors. So one person could be eating 3000 calories and still lose the same amount of weight as someone on 2200 calories or lower. Welcome to the Blackpill.
The next step to ensure muscle retention is to eat adequate protein. Protein comes in many forms as seen on this list however the amount you need depends on both your current bodyweight and your body fat. The general consensus is 1g per pound of bodyweight or 2.2g per kilo of bodyweight, data once again provided by Eric Helms et al shows that eating more protein than this creates an effect of "diminishing returns" in terms of preserving muscle however an increase may improve satiety.
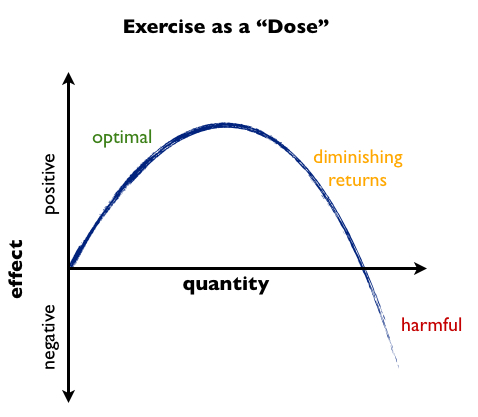
But an overdose of protein can be harmful to your kidney health so use adequately. Consuming protein like this must also be done consistently to ensure results, there's little point in adhering strictly in the week to blow it all off and eat junk on the weekend and then rinse and repeat. Protein is king when it comes to preserving muscle mass and carbs and fats whilst important play second fiddle to protein. The priority when setting your nutrient ratios and distributing your calories should be Protein>Fats>Carbs. Protein first to preserve muscle and provide energy, fats second to regulate hormones and t-levels and carbs last to provide glycogen and energy to the muscles. A typical ratio is 25% protein, 25% fat and 50% carbs or you can switch carbs and fat percentages depending on your preference and anecdotal results. That being said there is a problem I've found with the above equation which is that its not suitable if you are especially overweight at 270lbs/122kg+. Eating 270g of protein overtime is a surefire way to be left with one kidney, To correct this simply follow this equation by first finding out your body fat percentage-navy body fat calculator. For example if you were a 270lbs male at 35% body fat this method makes you eat the same amount of protein as the weight of your lean tissue. 270lbs x 1= 270g 270 x 0.35= 94.5. 270-94.5= 175.5g of protein.
Exercise-
Exercise is a tool to supplement your diet and increase your energy expenditure thus decreasing your bodyweight. I recommend lifting weights with a balance of hypertrophy and strength to initially increase your deficit and then once you get to lower levels of body fat you can introduce cardio. Too much cardio can be metabolic (muscle loss) and lead to the aforementioned problem regarding metabolism so use wisely and sparingly. A weight lifting routine I'd recommend for beginners is the Starting Strength 5x5 full body routine by Mark Rippetoe where you hit the major muscle groups of your body 3x a week by using compound lifts such as the bench press, squat and deadlift. Compound lifts hit multiple muscles of the same group, for example the bench press works the chest, shoulders, triceps and lats whilst the deadlift works the major back muscles, biceps and legs. This routine is superior for beginners because frequency of training is key at the start as opposed to volume or intensity. Furthermore in a full body routine you work your muscles 3x a week as opposed to a body part split that only works your muscles once a week or push pull legs split which only works your muscles 2x a week. A generic full body routine looks like this-
There are many different forms of cardio like boxing or sprinting or other outdoor activities however when using strictly gym equipment there are two main types of cardio forms that can be used on machines like the treadmill or the elliptical. These are LISS (low intensity steady state cardio) and HIIT (high intensity interval training). If you are 25% body fat or higher I would recommend LISS cardio, this is because it is easier on your joints and will not tax your nervous system as highly as HIIT training would. To perform LISS cardio set your treadmill speed at a slow/medium walking pace and increase the incline highly, to burn a decent amount of calories via this method you'd want to keep at it for a longer period of time depending on your level of fitness. If you are 20% body fat or below I would recommend HIIT cardio not only because your level of fitness should be able to handle it but also because its less time consuming and more effective at burning calories than LISS. As well as this HIIT burns calories even after you have finished doing it due to the elongated elevated heart rate as opposed to LISS which only burns calories during the session and a small window afterwards. To do HIIT training, switch between a walking pace and sprinting pace at 3-1 minute intervals. Ideally you'd want to reach a fitness level capable of switching from LISS to HIIT as soon as you are able as its more effective in achieving your goals.
Daily steps is also another underrated way to increase the calories you burn, personally my goal is to complete 7500 steps daily however I scaled up from 2500 steps. By doing this I burnt more calories and used it eat more calories which makes the process easier. For example to lose body fat you could eat 3000 calories at this point in time however had if you're not doing daily steps you would only eat 2700/2800 calories. These can easily be tracked by your smartphone or a fitness watch, the calories you burn by doing so can also be estimated using this chart.
Fasting, Intermittent Fasting, Ketogenic Diet
The dieting methods listed above are not fads but are sometimes portrayed as this holy grail of weight loss that will solve all your problems, you've probably seen them scattered across this site and others with people claiming absurd things. These diets are simply manipulations of CICO and have their benefits and disadvantages, for example intermittent fasting is great at regulating insulin sensitivity which is directly correlated with your fat cells however if you're eating more than your maintenance calories within that window you will gain weight not lose weight. Another example is the ketogenic diet which I only recommend for mini-cuts and even then its not a favourite of mine. Carbs are vital to how you perform when you exercise and so by taking away that energy source you are taking away from hypertrophy/strength feats you could be achieving. Remember these methods supplement CICO not the other way around.
The Golden %
Once you reach what I believe is the optimal body fat percentage for facial/body aesthetics (12/10%) the law of diminishing returns also appears here. This is because at this point you have reaped the benefits of losing body fat and anything lower starts to reach those levels of gauntness that isn't desirable and the risk of losing muscle is too high if you go any lower (if natural). There is very little you can do at this point and if you are at this point then you have truly reached your max potential as a a natural softmaxer at least in terms of leanmaxxing. I would advise you to keep hydrated and regulate your sodium levels to avoid facial bloat and eat volume foods and foods high in fibre to keep satiated in order to maintain this level of body fat because it is by no means easy but that is the cost of leanmaxxing.
Section 5: hardmaxxing
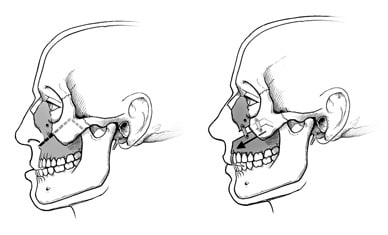
An open bite occurs when excess bone grows above the molars, causing what's normally a flat, even surface to become angled. To fix this, your surgeon shaves away or removes the excess bone.
Once the jaw is realigned, plates and screws hold the bone in its new position.
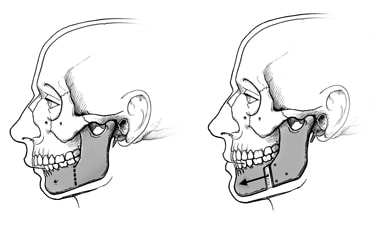
A mandibular osteotomy can correct:
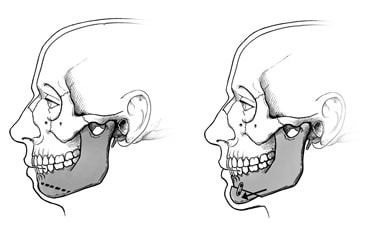 Chin surgeryEnlarge image
A genioplasty can correct a small chin (deficient chin). A small chin often accompanies a severely receded lower jaw.
Typically, surgeons can alter the jaw and restructure the chin during the same surgery. The surgeon cuts a piece of the chin bone on the front of the jaw, moves it forward, and secures it in a new position with plates and screws.
After initial jaw healing — at about six weeks — your orthodontist finishes aligning your teeth with braces. The entire orthodontic process, including surgery and braces, may take several years. Once the braces are removed, retainers to hold tooth position may be used.
The preferred jaw angle has these characteristics: 130° in face profile view, intergonial width similar to facial width, vertical position in frontal view at the oral commissure or at least not below the lower lip, jawline slope in the face frontal view nearly parallel to (with a maximum 15° downward deviation from) a line extending from the lateral canthus to the alare, ascending ramus slope 65°–75° to the Frankfort horizontal, and curvature in the oblique view visible from earlobe to chin and not pointy.
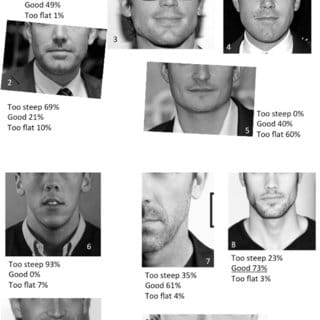
Redirecting
But what if your jaw looks like the example on the left side and you aim for a look like on the right side ?
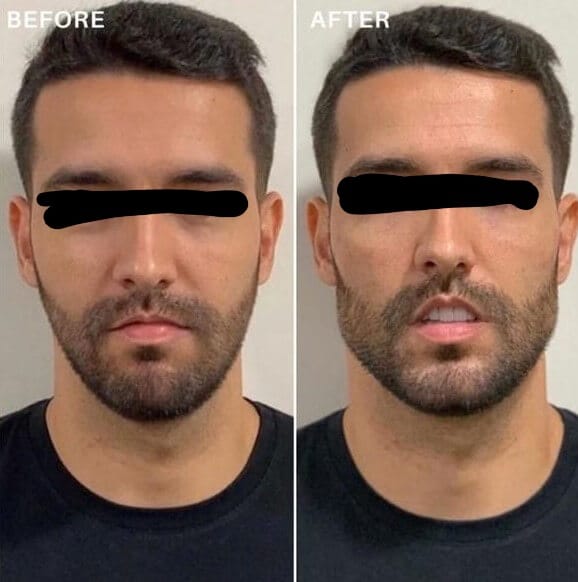
It turns out that it's necessary to take a look at the underlying scelettal situation. What makes a jaw wide, angular and aesthetic from the front are mainly:
- Width and shape of the jaw angle i.e. shape and thickness of the posterior corpus mandibulae that connects to the ramus
- Position and size of the masseter muscle and the medial pterygoid muscle
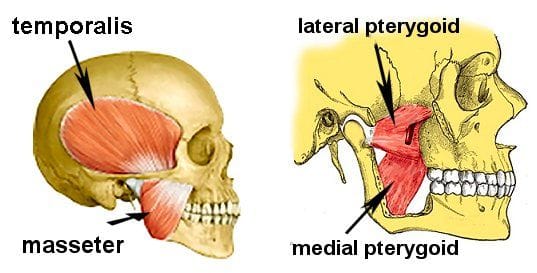
A narrow, unaesthetic jaw, with blunted, rounded jaw angles, which reeks of micrognathia and other illnesses is often the result of posterior mandibular hypoplasia that is expressed by a severe lack of posterior lateral growth of the corpus mandibulae, malplacement of the ramus or TMJ issues.
When we look at this example, we find relatively normal TMJ to dentoalveolar arch vectors which indicates that this patient has a narrow jaw due to posterior hypoplasia and not because of TMJ problems. This is the most common cause of a rounded jaw:
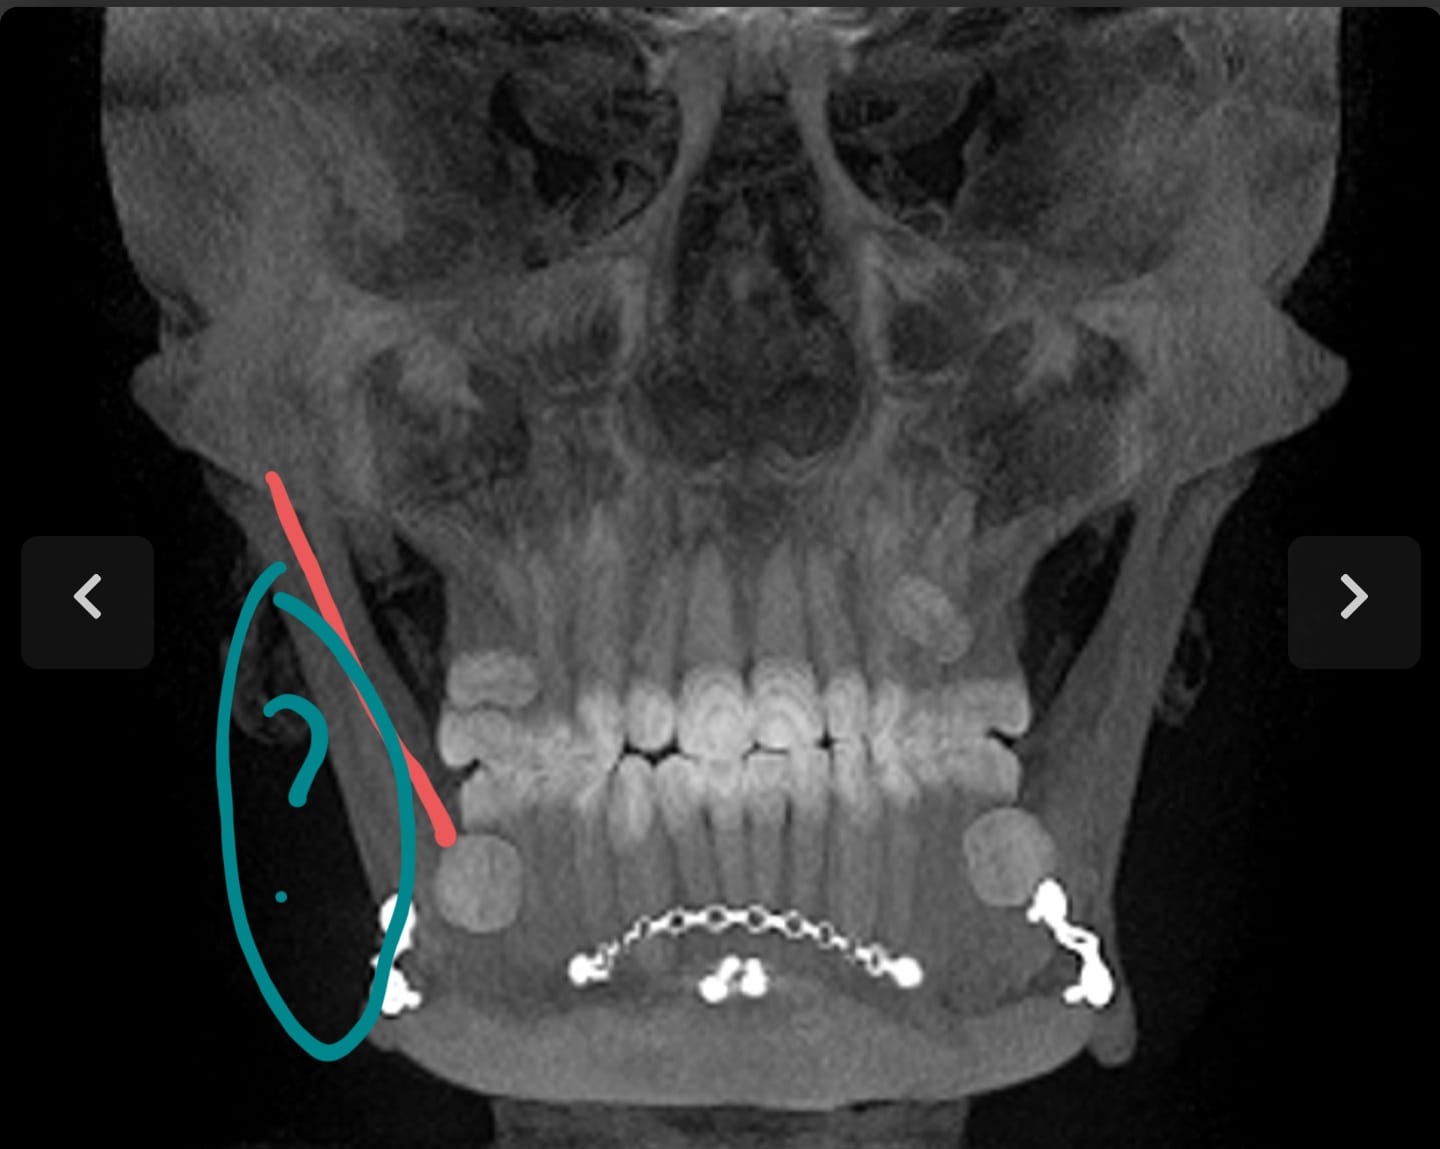
Red line: The vector
Blue circle: Lack of bony mass
So lets talk about solutions. In my opinion, implants are unfavorable for young patients, silicone because of the infection and erosion risk, medpor because of tissue ingrowth, unsatisfactory ossification, titanium because it doesn't interact with the body AT ALL and can cool down dangerously in cold wheater and HA paste well because it usually looks like shit and has other issues. It's literally bone or death.
The patient above already got a chin wing which mainly increased mid mandibular width, but also some posterior width as shown below:
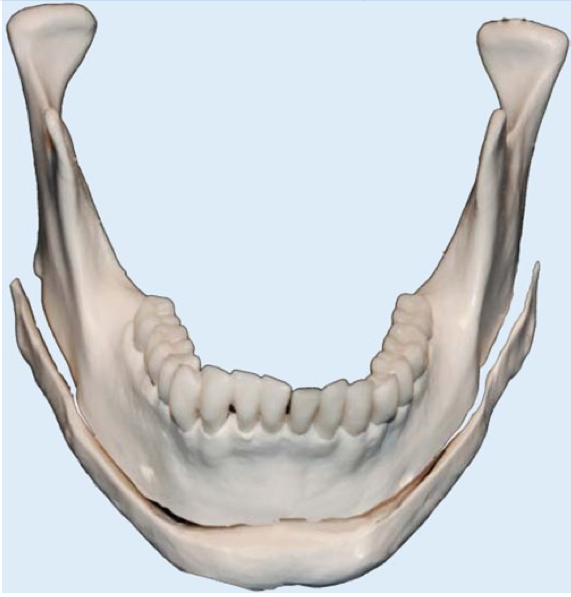
However, unfortunately, the jaw angles tend to get lost during this procedure as shown below:
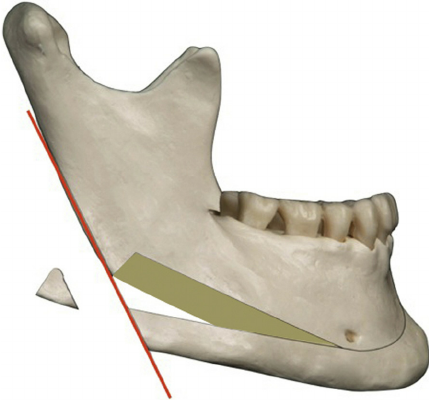
Reconstruction and replacement of the jaw angles and masseter muscles is therefore needed as shown in this surgical simulation:
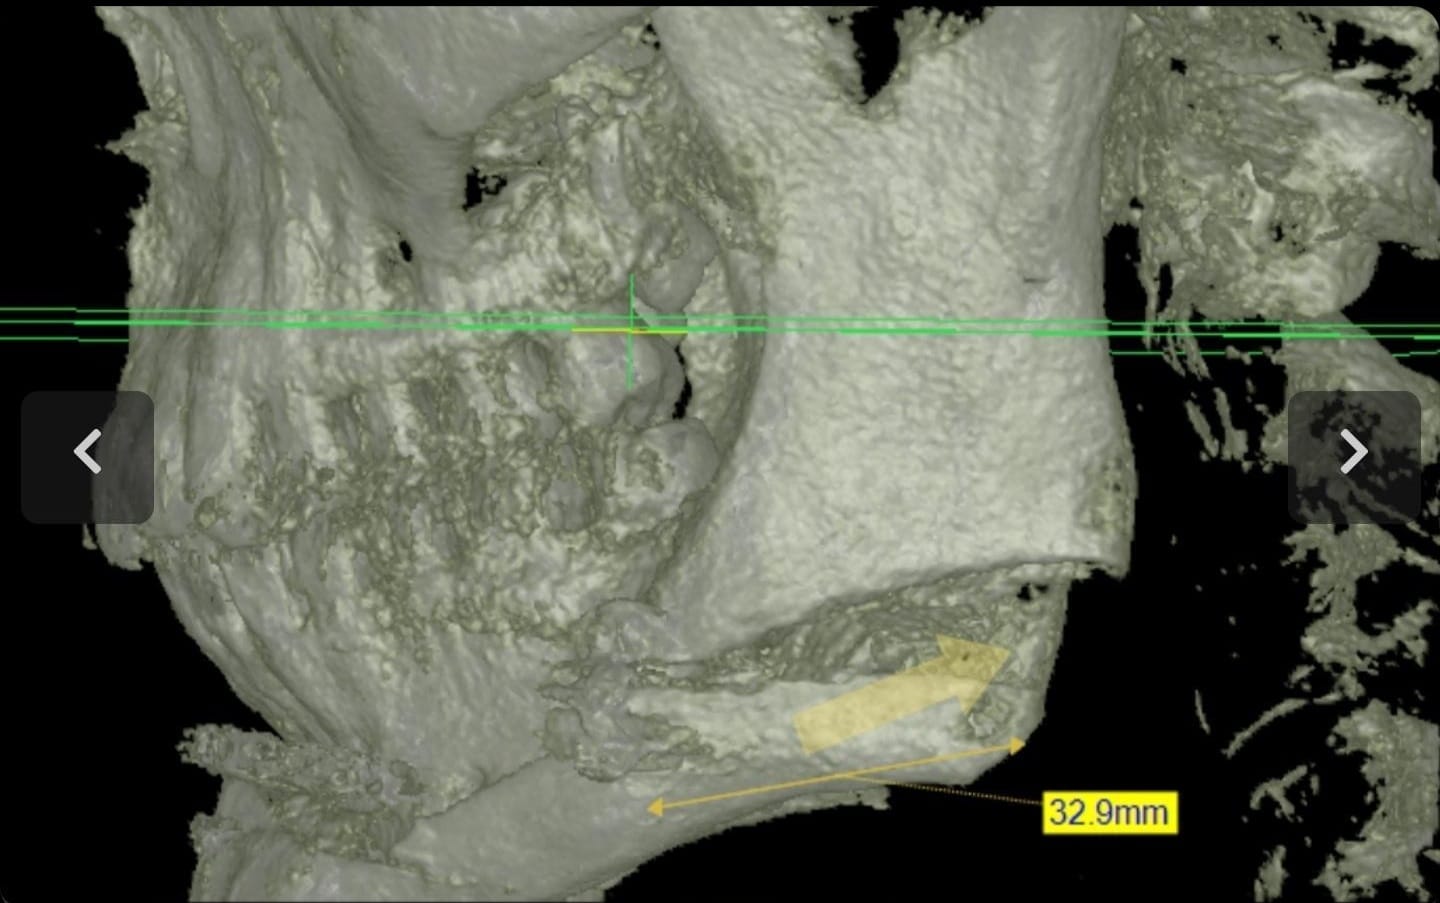
This is the so called side wing. It should add anything between 8 - 14mm bigonial width, reshape and accentuate the jaw angles and reposition the masseter muscles.
However, in some cases this will not be enough, and in some cases an aggressive side wing might produce unfavorable outcomes. In that case, a BSSO can help (narrow jaws are almost always recessed so you'll need this anyways probably)
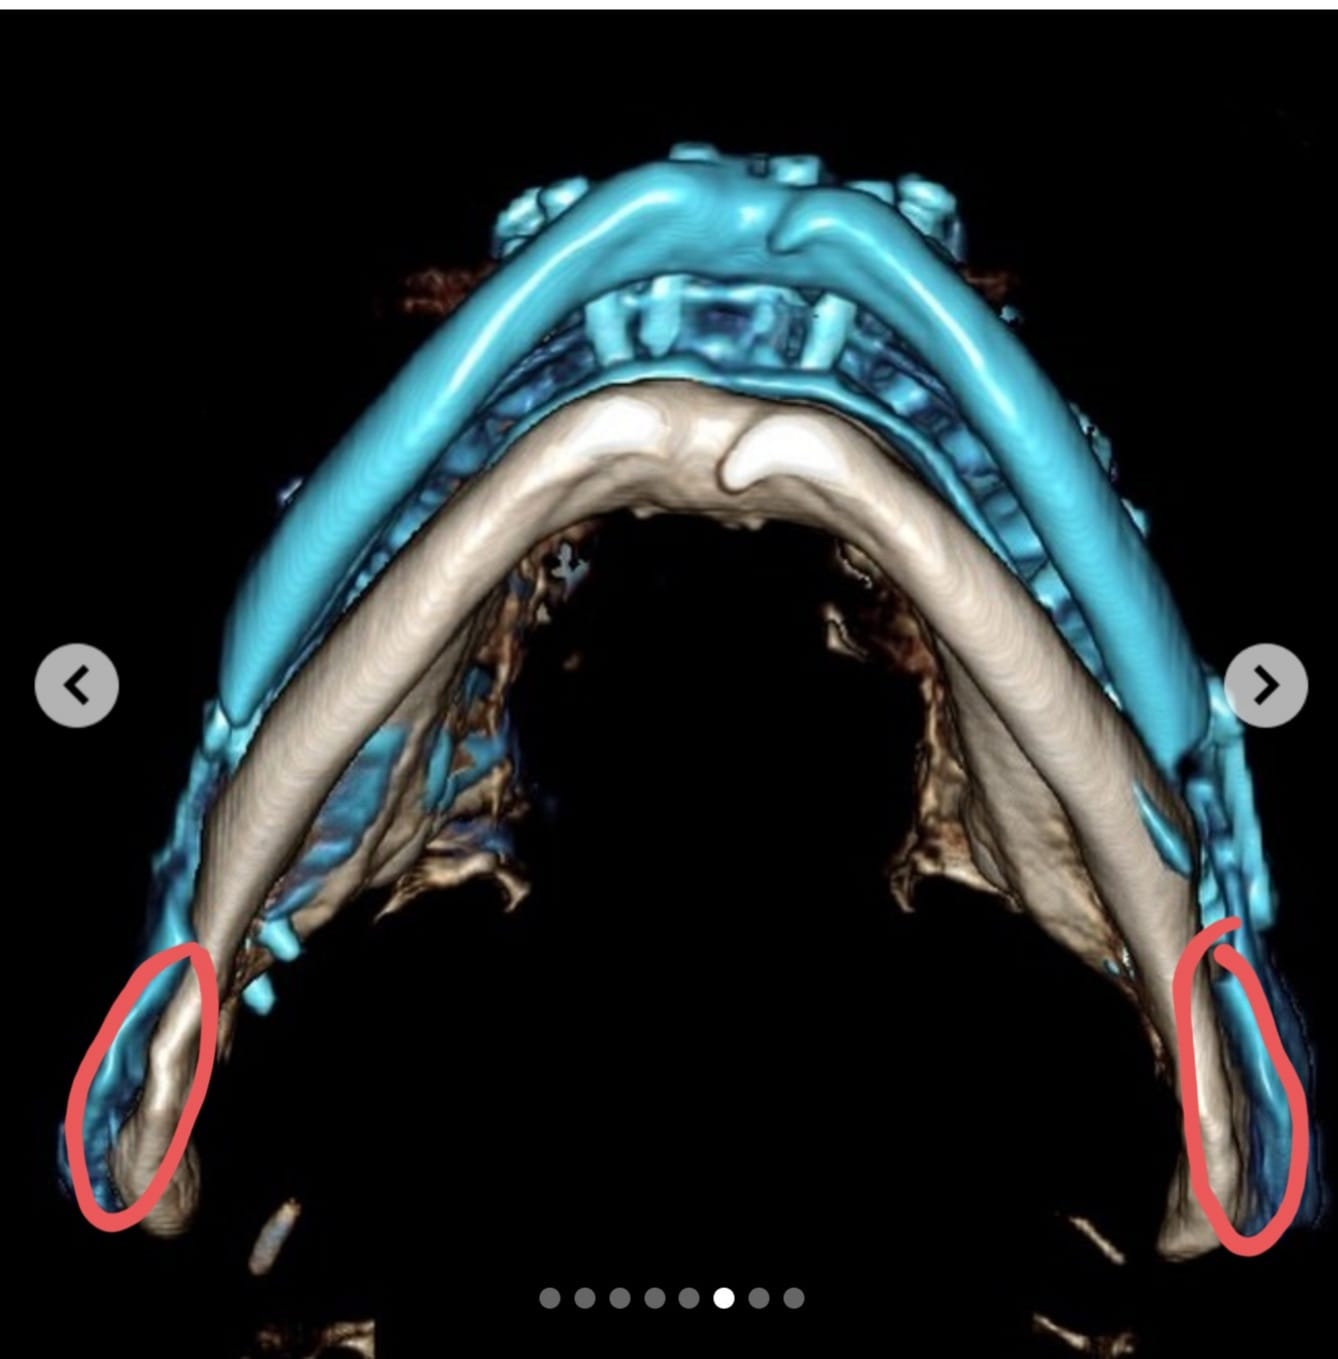
The red circles show the consequence of ramus widening with a BSSO, around 4 - 6mm per side. Combined with a side wing it could add almost 25mm wigonial width.
There's a guy from jawsurgeryforums who had a chin wing and side wing, plus very little fillers done. This is his before and afters:
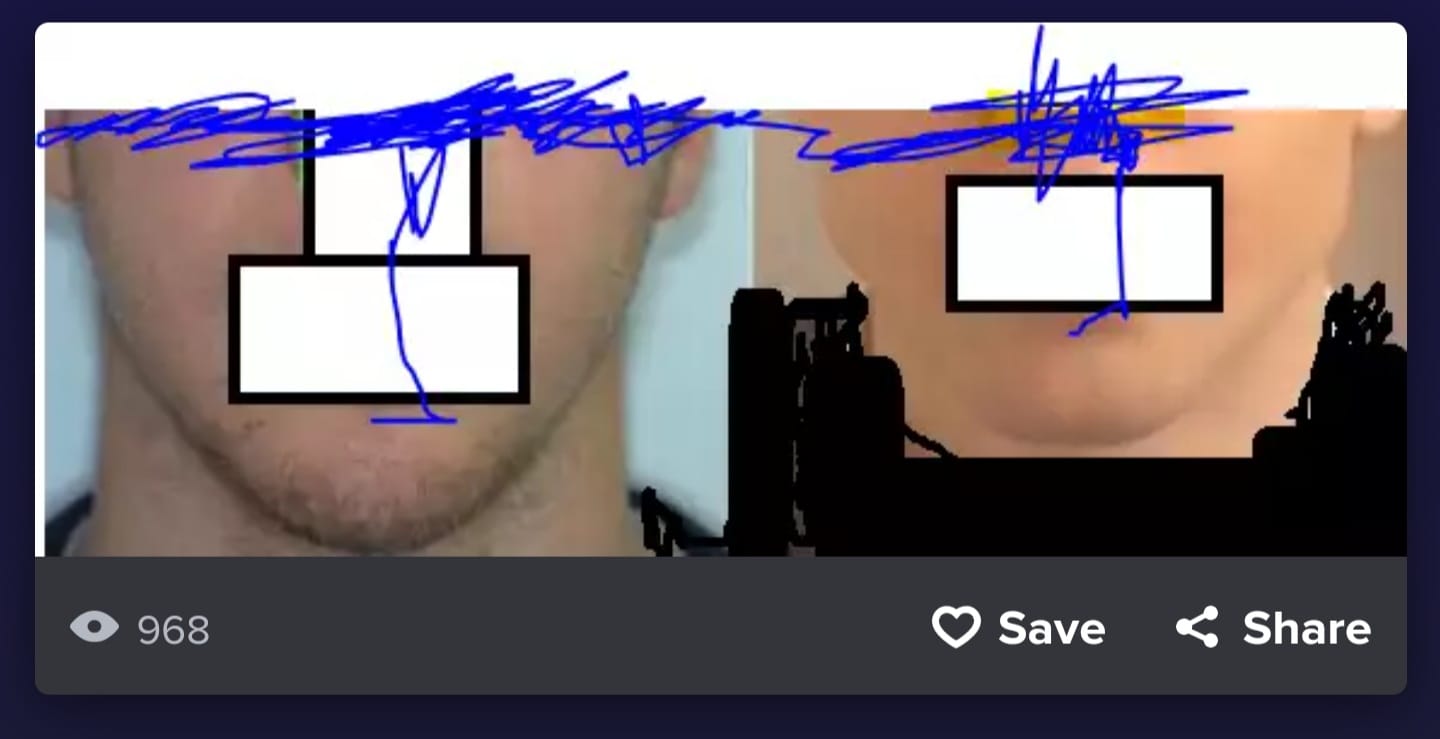
If it hadn't been enough, he still could have gotten the BSSO.
To sum this up:
- A narrow jaw with inward tilted jaw angles is best fixed with a chin wing, side wing, BSSO and some fillers on top.
- Young people should stay away from implants.
- And additional information: IMDO doesn't accentuate the jaw angles, it just makes the whole jaw wider which is not desired.
Section 6: neckmaxxing
Jaw Development
One of the characteristics of attractive men is having a muscular and defined Jaw line.
Why is this attractive? For the same reason muscular and proportionate bodies are attractive in men, A muscular jaw and a muscular neck go together. Thus having a sharp jawline and thick neck is an obvious sign of physical vitality and strength.
Men with skinny necks tend to have comparatively weak looking jawlines. There are exceptions perhaps, but overall it is a malnourished look, and even if a man’s jawline is defined, his face looks weak because of the lack of muscle.
Basic Neck Training Anatomy
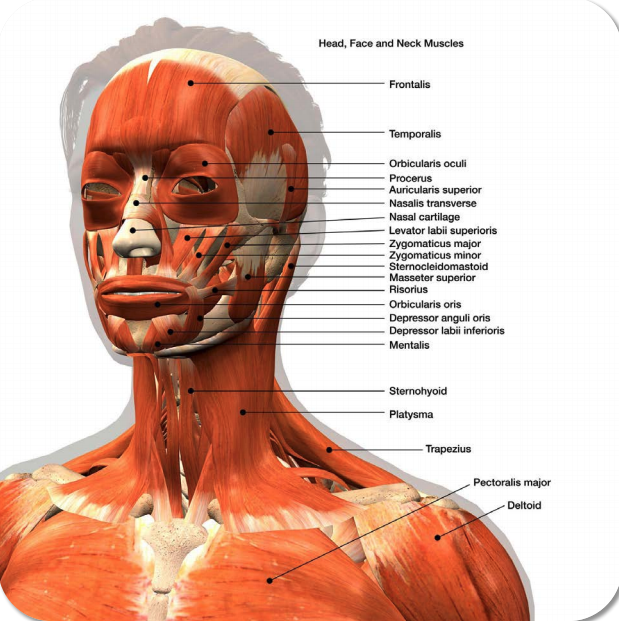
Now that we’ve talked about WHY you should train your neck, let us get into some practical anatomy and training.
To start with, the neck has over 25 different muscles that attach to it. That is A LOT of muscles. I am not going to name all of them, as it would detract from the point, but be advised that almost all of them are SMALL muscles, and they are not difficult to injure.
The neck has many muscles, but these are not muscles that you can sloppily train. I’ve seen many athletes overdo neck work and be left with strained muscles, a headache, and regret that they didn’t slow their roll and train smarter.
When you do any kind of neck training then, always start conservatively. As you’ll see in the exercise section, I do not advise weighted neck work until you’ve been training your neck regularly with bodyweight movements for at least 4-6 weeks.
That in mind, the easiest way to think about neck training is categorise it into functional directions.
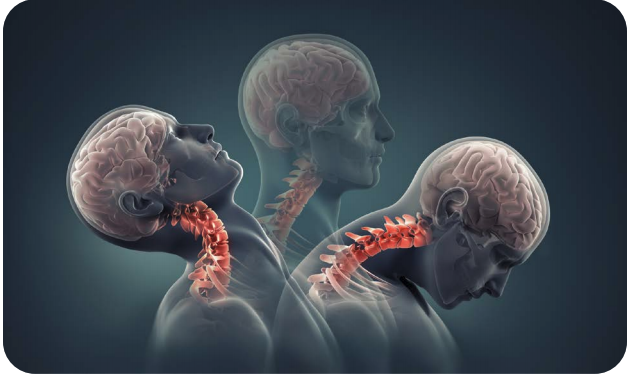
Your neck has 4 basic functions/directions it can move in:
1. Flexion (looks down)-this is tucking your chin to your chest. Many boxers practice neck extension, but its training FLEXION that makes your neck stronger and more resistant to being snapped back by a punch
2. Extension (looks up)-Being able to extend your neck is hugely important in grappling and wrestling of any kind, as you use your neck to resist and move your opponent. The cervical extensor muscles and the trapezius contribute the most to this function
3. Lateral flexion (side to side head tilt)-the lateral flexor muscles on the sides of the neck are quite small, and they are some of the easiest to injure. Always be very conservative training lateral flexion
4. Rotation (turning your head)-Rotation can be trained with bodyweight initially, and there are some new neck training hardnesses on the market that allow for loading rotation in training. At the more advanced level of neck training it is usually done with wrestler’s bridge work. Training rotation is not always necessary, and many athletes find that simplifying do flexion and rotation is sufficient, but it is a movement capacity you can train regardless
For being a fairly short limb then, you realise that your neck has multiple ranges of motion. Any neck exercise you do is going to train one of the above functions.
Training the Neck 101 and 201
Training the follows a simple path of progression
1. At the beginner level, you start with unweighted bodyweight exercises, done for 2-3 sets twice a week
2. After 4-6 weeks, you can start adding weight to your bodyweight movements, and incorporate isometric movements
3. After another 4-6 weeks, or 2-3 months, you’ll have the strength and muscle to do more advanced bodyweight work like wrestlers bridges
Neck training SHOULD always be done for high reps and/or sustained time under tension. Being overly ambitious with your neck training could cause severe and even life-threatening injuries
And keep in mind there is no such thing as heavy neck training
If you have never trained your neck, I would suggest starting with BODYWEIGHT first. Do not attempt any kind of weighted exercises
The Neck and The Yoke
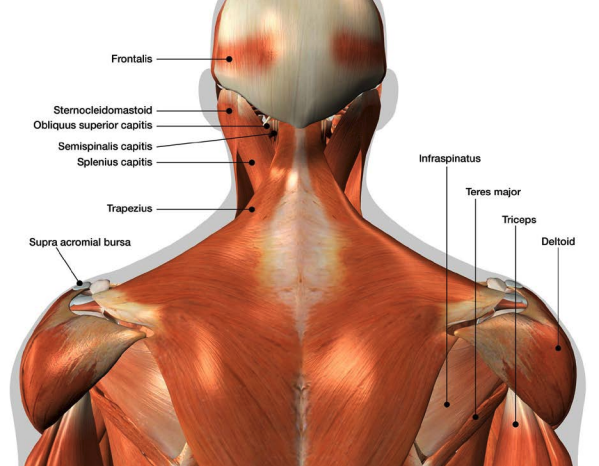
The "Yoke" in the lifting world refers to the neck, traps, and upper back. Even if someone is not that big in sheer size, if they have a thick neck, traps, and upper back, human beings intuitively know that person is physically strong.
This creates a "look of power" that is biologically undeniable.
The Trapezius muscles attach to the base of the skull, and during movements like shrugs, deadlifts, and barbell pulls, the neck has to stabilise isometrically.
Developing the trapezius muscles then can often increase the circumference and thickness of the neck without any direct training of the neck itself
Neck Training Routines
While I list out many different routines below, keep in mind that you can mix and match your neck exercises. There is no set routine you need to do, neck can be train 2-3 times weekly, and you can change the exercises each time
The one “Rule” to follow is to balance out of your neck training with both flexion and extension work. It does not need to be a 1:1 ratio, but you do want a blend of movements. Don’t overdo using a neck harness or doing head extensions and then be surprised when your neck hurts.
The following routines can be done 2-3 times weekly. They run from beginner routines, all the way to advanced routines with harder movements
Basic Neck Training 1: Go To Routine from Josh Bryant
Obviously I know this routine is 100% free on youtube, but I have to share it's an incredible routine. The one caveat to this routine is that the lateral flexion and rotation can actually be too much for people initially. If you’ve got a very stiff neck and tight upper traps, this routine may not be advisable. If you don't though, I’d suggest doing this 2-3 times weekly.
Basic Neck Training 2: Bodyweight Only, Flexion and Extension Only
If you want to train neck every workout, you could do the following.
It's easy to recover from, it's unlikely to lead to neck stiffness, and you’d notice results in a few weeks.
Bodyweight Neck Flexion, 2 sets x 15-30 reps
Bodyweight Head Extensions, 2 sets x 15-30
Basic Neck Training 3: Bodyweight Only Bodyweight
Neck extensions, 2 sets x 15-30 reps
Bodyweight Head Extensions, 2 sets x 15-30
Lateral Neck Flexion, 2 sets x 10-15 reps
Basic Neck Training 4
Swiss Ball Iso-hold Neck Bridge (also called a neck plank) 2-3 sets x 30-60 seconds
Front Bridge Iso-Hold on Bench 2-3 sets x 20-60 seconds
Lateral Neck Flexion, 2 sets x 15-30 reps
Intermediate Neck Training 5
Front Neck Flexion with plate on Forehead 2 sets x 15-25 reps
Head Extension with plate on back of forehead 2 sets x 15- 25 reps
Lateral Neck Flexion, 2 sets x 15-30 reps
Intermediate Neck Training 6
Front Neck Flexion with plate on Forehead 2 sets x 15-25 reps
Neck Harness 2 sets x 15-25 reps
Banded Lateral Neck Flexion 2-3 sets x 10-15 reps
DB Shrugs 2 sets x 25-30 reps
Weighted Neck Workout 7
Front Neck Flexion with plate on Forehead 2-3 sets x 15-25 reps
Neck Harness Extension 2-3 sets x 15-25 reps
DB Shrugs 2-3 sets x 25-30 reps
Neck Training: Bridging
Some coaches will advise you to never do neck bridges, while others will swear by them. I would advise caution. If you can get your neck muscular doing the above routines and are satisfied with your results, then maintain doing what works.
Bridge Workout 8
Back Neck Bridge 2-3 sets x 60-120 seconds
Front Neck Bridge 2-3 sets x 60-120 seconds
Neck Training Routines on Youtube
Ross Enamait
 youtu.be
The Top 8 Neck Exercises
I have listed this out from the most basic, to harder exercises that require more training, and movements that require some equipment. This is not a comprehensive list, but it is the most tried and proven exercises.
1. Head Nods/Chin tucks-Forward Flexion
This is a staple training technique of Brazilian Jiu-Jitsu, Judokas, and boxers. You can do this on a mat or, laying on your back with your head hanging off the end of a bench. Lift your head and bring your chin to your chest for a set of 15-25 reps. 2-3 sets is the best recommendation.
This movement can obviously be done weighted, typically by using a plate placed on the forehead (and padded with a towel). The weighted version follows the same set and reps as the unweighted version.
2. Head Extensions
This is the reverse of the head nod. These are best done with chest down on a bench, with your head hanging off the end off the end. You drop the head down towards the floor, and then extend the neck and look up. When doing these, it is important to not extend too far back and compress the cervical spine. These are done slow and control, and not with momentum. Like the front flexion, these are for a set of 15-25 reps. 2-3 sets is the best recommendation.
This movement can also be done weighted, typically by using a plate placed on the back of the head and held in place with the hands (and padded with a towel). The weighted version follows the same set and reps as the unweighted version.
3. Lateral Head Flexion
This is a popular movement, but in my experience it leads to a lot of cramped necks and spasms. You have to be very conservative the first time you do this exercise. If you are going to do these, do them with bodyweight only. They are best done for a set of 15-25 reps. 2-3 sets is the best recommendation.
4. Head Rotation
This is an overlooked exercise, but so simple and effective. You hang your head off the end of the bench, and fully rotate your neck to the right, and then to left, and then repeat that going back and forth. Basically you look right, look left, back and forth, back and forth. These are best done for high reps in the 20-40 range (per side). If you have a specialised neck harness, these can be done standing and with resistance, but there is no effective way to add resistance to the bodyweight version on the bench. Stick with the high rep work
5. A Neck Harness
Neck Harnesses are RARELY seen in modern gyms, but they WORK. I have one and I have used religiously in the past. DO NOT buy a cheap neck harness. I've had my Spud harness for 5 years now, it's built to last. A cheapy neck harness that snaps is an accident waiting to happen. With a neck harness, you will place it securely around the skull, and sit upright, your hands placed on your knees. String a weight plate through the neck harness chain, and extend the head up. Lower into slight flexion, then back up again. This movement should be performed with a controlled tempo and done for high reps. Add weight as appropriate. 2 sets of 20-30 reps twice a week is a good starting point
6. Walk Tall
Josh Bryant popularised this movement (Bryant is the great coach and writer of Jailhouse Strong)
In a Walk Tall, you use a head strap of some kind, I personally have used a hanging ab strap, and you attach it to an elastic band or cable stack. You then walk forward and walk backwards. This is done with tension/weight of course. This is an isometric contraction can also be done sideways and backwards as well. This allows you to strengthen the neck from all four directions. You would do for 30-60 seconds in each direction, 1-2 times.
7. Stability Ball or Bench Neck Bridge (Neck Plank)
This exercise is a regressed version of the neck bridge. The stability ball offsets some of your bodyweight while also providing a more comfortable and accommodating surface to bridge from versus the floor or a bench. An advantage that this has the over the floor is that you can safely perform neck roll movements without fear of injury. Perform for 2-3 sets of 30-60 seconds.
8. Wrestlers Bridge
Bridging is a controversial exercise. While its universally practiced by wrestlers, and wrestlers have the thickest necks of any athletes, it also tends to be very very aggravating orthopedically, and wrestlers also tend to have chronic neck problems as they age. If you want to incorporate into your training, you absolutely can, but if you don’t want to include it, that is fine too. Ultimately we all exercise at our own risk. At the level of doing bridges, 2-3 sets, working both the front and back of the neck, would be effective. If you want to do more advanced movements though, go for it.
9. A Neck Machine (IF you can find one)
They are the most all around effective piece of equipment you can use. The downside is that they are very very rare. Only the most old school and hardcore of gyms will ever have a 4-Way Neck machine. If you do come across one, they are definitely worth using though. 2-4 sets, 10-20 reps each direction, done twice weekly.
section 7: bonesmashing
Bonesmashing works, if you listen to videos of surgeon being interviewed on the subject they don't deny it works. They say its dangerous and that the result can easily look terrible.
You can easily destroy your collagen, get uneven growth, mistake swelling for gains, get scar tissue, look like a freak, etc.
So how do we get bone growth without all these underisable side effects? I think Ive found a way and I am going to test it for the next year and see if I get any improvement, will come back to share ofc.
Disclaimer:
you will not get the same result as implant with this method, if you have the means and want rapid improvement, get surgery. I devised this method to induce growth AND preserve/improve the health of my skin and bones. So this is 50/50 for facial development and anti aging. I don't expect much growth in a year, I see this as a way to improve my face in the long run.
The logic:
-Shin conditioning, which increase bone mineral density and size(girth) over time is done in many ways: jogging, kicking heavy bags and shin rolling. They all work to create micro fractures in the bones.
-Amongst these method only shin rolling can be applied to the face. So instead of hitting the bone, we can apply pressure to the bones on our face therefor reducing swelling and since the movement is continuous across the bone, we can expect the result to be more consistent across the bone itself.
-A moisturizing cream can be used before each session to further reduce damage to the skin.
-Bone supporting supplements ; mag,zinc,calcium,k2,d3 should be taken at high dosses to ensure the body as the required nutriment to repair and grow bones.
-A pulsed electromagnetic field (PEMF) device can help build bones. Multiple studies have proved that it is a way to help osteoporosis by increasing bone mineral density and osteoblast, which is the process by which the body builds/grow bones.
- Using a PEMF device, which is very safe, as much as possible and especially after a bonesmashing session will most probably speed up the process of bone growth.
The tools
-Moisturizing cream.
-Bone supporting supplements.
-Gua sha set
Method
-Apply moisturizing cream at least 5 minute before bonesmashing session.
-Apply pressure to the zygomatic bone, undereye, zygomatic arch and half of the jaw starting from the gonions. Apply continuous pressure for a set period of time, equal for each side of the face both in length of time and pressure. Use the gua sha stone or roller depending on the bone. Both can do the job. Its up to you.
-Take bone supporting supplement as follow
-Calcium 1500mg/day
-K2 1mg/day
-Zing 50mg/day
-Mag 500mg(elemental)/day
-d3 20000 iu/day
-Use PEMF face mask at least 30min per day, once I receive it I will see if I can comfortable sleep with it.
Benefits:
Obviously bone growth is the main goal of this method, but there are other benefits to using a PEMF machine:
Section 8: conclusion
this thread has taken me 2 full long days to make to find all the info and pics it was really a hassle. i wanted to make my last post/thread really long and detailed and hope everyone ascends because of it. i really had fun here with all the people i met here sadly i will not be an active member anymore, unfortunately i have no reason to be here i have already ascended and "glowed up" ofc ill come by once and a while and check up but i will not be as active as i was before. i hope everyone ascends from the threads i have created and just in general. goodbye
pinging people that might want to read this megathread
@Nihilus @tvhd @DonsaMogger @F.5ancy @Dean @Yeyi @Looksmaxlossus @Looksmaxxer69
@Dean
sticky thread?
If you want jaw gains, Theres 3 things I can recommend for chewing. Those 3 things are mastic, falim and chisell. I’ll go into depth.
Part 1: Falim
Falim is a gum that has a bland, gas station gum like taste. The texture of it is smooth. When you chew on it, it’s hard but too hard for a beginner. Its also cheap. If you want to get into chewing, falim is a great place to start.
Part 2: Mastic
Mastic is a gum that looks like crystals when you take it out of the box for the first time. You have to chew down on them a little bit to turn it into gum.
once it’s been turned into gum, it has a texture that looks exactly like falim. The hardness of the gum is more than falim imo. The taste is also very different. The taste of falim is bland, the taste of mastic is very “earthy”.
Some users here have said that it tastes like dirt. In my experience, it tastes terrible and leaves a bad taste in your mouth after chewing. So if you can’t tolerate gum tasting bad, mastic isn’t for you. I also wouldn’t recommend mastic for chewing beginners, it’s very hard and can wear your jaw out easily.
Part 3: Chisell
Chisell is chewable silicone that is shaped like a small rectangle. The hardness of chisell varies. It comes in 3 versions, which are “light bite”, “medium bite” and “tough bite”.
I’ve bought all 3. The one you buy depends on how long you’ve been chewing. If you’re a beginner, buy the light bite. If you have some experience with chewing, get the medium or tough bite.
Chisell is not meant to be the only thing you chew either. It’s complementary. If you only chew Chisell, you will wear it down quickly and put holes through it, which renders it useless.
How to chew:
Part 1: Chewing with mastic and falim
Where you chew with mastic and falim is less important. You can chew on your molars, premolars, canines and so on. You will still get gains. You should ideally be chewing with an UP AND DOWN motion.
The length you chew falim or mastic should not exceed 2 hours a day. Or 1 hour a day if you’re combining mastic/falim with another jaw building method like chisell.
If you chew for too long, you will wear down your teeth and put yourself at risk for TMJ. You do NOT WANT TMJ. TMJ will force you to give up chewing.
Part 2: Chewing with chisell
Chisell should ONLY be chewed on your molars. NO EXCEPTIONS. If you chew it on your premolars or canines, you will put holes into your chisell quick, which will end up in it being useless and unchewable. This isn’t just my opinion either. It’s literally in the chisell manual.
and what to expect:
After chewing for 5 months to a year, you can expect a significantly more defined/widened jaw due to a bigger masseter muscle.
Your masseter muscle isn’t the only thing that can be benefited from chewing. Other regions of your face can also see changes. Examples are your zygomatic arch and your ramus. I don’t want to go too much into detail, so I’ll just link threads and articles that explain or detail this.
Here are some examples of people who chew maxxed


Bloat:
This section won’t be long because it’s simple.
Chewing will look like shit if you’re bloated. Lose weight and cut BF if you want your chewing to make your face look defined.
Section 2: beard frauding
not really improving the jaw but can 10 times make your jaw better

taking care of your beard:
Keep your beard soft and healthy by conditioning it regularly with beard oil. This lightweight product moisturizes the skin underneath your facial hair to prevent itchiness, control flakes, and maintain follicle health.
How to Use Beard Oil
1. Pour a few drops (less is more) into the palm of your hand and spread it evenly between both hands.
2. Massage the oil into the base of your beard (it can be dry or damp for this step, but should not be wet).
3. Work your hands through your beard until you’ve reached the hair tips. Spread the oil evenly over your entire beard and the underlying skin.
How Often Should I Oil My Beard?
A well groomed beard needs to be oiled regularly, but exactly how often depends on a number of factors. Consider the climate in your area, your skin type, and your hair type to enjoy a well groomed beard.- If you live in a dry climate or have dry skin/hair, apply beard oil daily or every other day.
- If you have oily skin/hair or live in a humid climate, apply beard oil 2-3 times per week.
- If you notice oily buildup or your beard gets greasy, oil your beard less often.
Trim Your Beard
Trimming a beard is an essential part of proper grooming. A trim beard is neat, attractive, and enhances your appearance. On the other hand, a messy beard gives you a decidedly unprofessional, unkempt look.When to Trim Beard
How often to trim your beard depends on its length, the way your hair grows, and what style you're going for. In most cases, a quick trim every 2-3 weeks will keep your beard looking neat and well groomed.Section 3: Mewing
self explanatory
- Correct Tongue Posture:
- Place the tip of your tongue against the roof of your mouth, just behind your front teeth.
- The entire surface of your tongue, including the back, should be pressed against the roof of your mouth.
- Maintain Lip Seal:
- Keep your lips sealed without clenching your teeth. This encourages nasal breathing.
- Breathe Through Your Nose:
- Focus on breathing through your nose rather than your mouth. This is an essential aspect of mewing.
- Correct Head and Neck Posture:
- Maintain proper head and neck posture. Keep your head in a neutral position without tilting forward or backward.
- Practice Regularly:
- Consistency is key. Practice mewing throughout the day, including during various activities like sitting, standing, or lying down.
- Some practitioners also recommend maintaining proper tongue posture even during sleep.
- Chew Properly:
- Chewing gum or food properly can also be part of mewing. Chewing strengthens the jaw muscles, which can contribute to facial development.
- Be Patient:
- Changes in facial structure take time, and results vary from person to person. Be patient and persistent in your mewing practice.
As we all know leanmaxing is one of the very few softmax methods that will significantly raise your psl but there's way too much inaccuracy and misinformation on this site and others about how to do this optimally whilst ensuring you don't ruin your metabolism, lose lean tissue and waste valuable time that could be spent looksmaxing on fad diets that end up becoming a looksmin. In this guide I will outline the fundamentals of fat loss, the science behind the small details as well as other little methods that will help you to optimally leanmax after you get to the golden range of 12-10%. Being high body fat 25%+ is a complete looksmin that lowers testosterone levels, causes skin issues like acne and hides your potential bone structure. Remember if you're not leanmaxing you're not looksmaxing.

CICO (Calories in calories out)-
This is the base rule of fat loss, calories in, calories out. Your body requires a certain number of calories (maintenance calories) to maintain its current weight, if you eat significantly more/less calories than your maintenance calories you will gain/lose weight. This number is comprised of your BMR (basal metabolic rate) (the calories your body burns doing nothing) multiplied by your activity multiplier (the calories your body burns while active). As a general rule of thumb you want to subtract 500 calories from your maintenance calories. This is because there are 3500 calories in 1lb/0.5kg of fat, therefore consuming 500 calories below your maintenance calories ensures you lose at least 1lb/0.5kg per week from solely dieting (500x7=3500). You can increase or decrease this deficit depending on how fast you want to lose weight and what your current weight is as well as doing exercise. To find out your maintenance calories you can use this online calculator to estimate your maintenance calories. Maintenance Calculator (you may have to +/- calories as its not an exact science)
Preserving Lean Tissue-
CICO essentially means that you can eat whatever you want as long as it is below your maintenance calories and still lose weight but not all of it is just fat if you do this. Which is how people use this method and then become fat again from eating low volume high calorie foods (fast food) or extremely skinny because they don't get enough protein and micronutrients and end up looking like this by losing all their muscle mass/lean tissue.
In order to preserve lean tissue, clinical data provided by Eric Helms et al shows that losing more than 1% of your weight significantly increases your risk of losing muscle. For example a 200lbs/91kg male should not lose more than 2lbs/1kg per week in order to retain lean tissue optimally likewise a 300lbs/136kg male should aim to lose a maximum of 3lbs/1.3kg. That being said the higher in body fat you are the less risk there is of losing muscle when dieting aggressively and vice versa with people with lower levels of body fat which is why you should slow down when reaching 20% body fat. Dieting with high deficits however like 800cals or above is a one way stop to ruining your metabolism and in conjunction your leanmaxing journey. The metabolism eventually adjusts to a point where the calories you're eating to lose weight become the calories needed to maintain your weight which is why once you stop losing weight on those calories you decrease them per usual. However if you decrease your calories significantly each time what ends up happening is you'll have to diet on 1200 calories (example) just to lose weight while the person who kept their deficit at a modest 500 calories and slowly decreased is dieting and losing weight on double that. There is one brutal truth to metabolism that depends on genetics which is that the metabolism of some people is higher than others due to genetics and other factors. So one person could be eating 3000 calories and still lose the same amount of weight as someone on 2200 calories or lower. Welcome to the Blackpill.
The next step to ensure muscle retention is to eat adequate protein. Protein comes in many forms as seen on this list however the amount you need depends on both your current bodyweight and your body fat. The general consensus is 1g per pound of bodyweight or 2.2g per kilo of bodyweight, data once again provided by Eric Helms et al shows that eating more protein than this creates an effect of "diminishing returns" in terms of preserving muscle however an increase may improve satiety.
But an overdose of protein can be harmful to your kidney health so use adequately. Consuming protein like this must also be done consistently to ensure results, there's little point in adhering strictly in the week to blow it all off and eat junk on the weekend and then rinse and repeat. Protein is king when it comes to preserving muscle mass and carbs and fats whilst important play second fiddle to protein. The priority when setting your nutrient ratios and distributing your calories should be Protein>Fats>Carbs. Protein first to preserve muscle and provide energy, fats second to regulate hormones and t-levels and carbs last to provide glycogen and energy to the muscles. A typical ratio is 25% protein, 25% fat and 50% carbs or you can switch carbs and fat percentages depending on your preference and anecdotal results. That being said there is a problem I've found with the above equation which is that its not suitable if you are especially overweight at 270lbs/122kg+. Eating 270g of protein overtime is a surefire way to be left with one kidney, To correct this simply follow this equation by first finding out your body fat percentage-navy body fat calculator. For example if you were a 270lbs male at 35% body fat this method makes you eat the same amount of protein as the weight of your lean tissue. 270lbs x 1= 270g 270 x 0.35= 94.5. 270-94.5= 175.5g of protein.
Exercise-
Exercise is a tool to supplement your diet and increase your energy expenditure thus decreasing your bodyweight. I recommend lifting weights with a balance of hypertrophy and strength to initially increase your deficit and then once you get to lower levels of body fat you can introduce cardio. Too much cardio can be metabolic (muscle loss) and lead to the aforementioned problem regarding metabolism so use wisely and sparingly. A weight lifting routine I'd recommend for beginners is the Starting Strength 5x5 full body routine by Mark Rippetoe where you hit the major muscle groups of your body 3x a week by using compound lifts such as the bench press, squat and deadlift. Compound lifts hit multiple muscles of the same group, for example the bench press works the chest, shoulders, triceps and lats whilst the deadlift works the major back muscles, biceps and legs. This routine is superior for beginners because frequency of training is key at the start as opposed to volume or intensity. Furthermore in a full body routine you work your muscles 3x a week as opposed to a body part split that only works your muscles once a week or push pull legs split which only works your muscles 2x a week. A generic full body routine looks like this-
There are many different forms of cardio like boxing or sprinting or other outdoor activities however when using strictly gym equipment there are two main types of cardio forms that can be used on machines like the treadmill or the elliptical. These are LISS (low intensity steady state cardio) and HIIT (high intensity interval training). If you are 25% body fat or higher I would recommend LISS cardio, this is because it is easier on your joints and will not tax your nervous system as highly as HIIT training would. To perform LISS cardio set your treadmill speed at a slow/medium walking pace and increase the incline highly, to burn a decent amount of calories via this method you'd want to keep at it for a longer period of time depending on your level of fitness. If you are 20% body fat or below I would recommend HIIT cardio not only because your level of fitness should be able to handle it but also because its less time consuming and more effective at burning calories than LISS. As well as this HIIT burns calories even after you have finished doing it due to the elongated elevated heart rate as opposed to LISS which only burns calories during the session and a small window afterwards. To do HIIT training, switch between a walking pace and sprinting pace at 3-1 minute intervals. Ideally you'd want to reach a fitness level capable of switching from LISS to HIIT as soon as you are able as its more effective in achieving your goals.
Daily steps is also another underrated way to increase the calories you burn, personally my goal is to complete 7500 steps daily however I scaled up from 2500 steps. By doing this I burnt more calories and used it eat more calories which makes the process easier. For example to lose body fat you could eat 3000 calories at this point in time however had if you're not doing daily steps you would only eat 2700/2800 calories. These can easily be tracked by your smartphone or a fitness watch, the calories you burn by doing so can also be estimated using this chart.
Fasting, Intermittent Fasting, Ketogenic Diet
The dieting methods listed above are not fads but are sometimes portrayed as this holy grail of weight loss that will solve all your problems, you've probably seen them scattered across this site and others with people claiming absurd things. These diets are simply manipulations of CICO and have their benefits and disadvantages, for example intermittent fasting is great at regulating insulin sensitivity which is directly correlated with your fat cells however if you're eating more than your maintenance calories within that window you will gain weight not lose weight. Another example is the ketogenic diet which I only recommend for mini-cuts and even then its not a favourite of mine. Carbs are vital to how you perform when you exercise and so by taking away that energy source you are taking away from hypertrophy/strength feats you could be achieving. Remember these methods supplement CICO not the other way around.
The Golden %
Once you reach what I believe is the optimal body fat percentage for facial/body aesthetics (12/10%) the law of diminishing returns also appears here. This is because at this point you have reaped the benefits of losing body fat and anything lower starts to reach those levels of gauntness that isn't desirable and the risk of losing muscle is too high if you go any lower (if natural). There is very little you can do at this point and if you are at this point then you have truly reached your max potential as a a natural softmaxer at least in terms of leanmaxxing. I would advise you to keep hydrated and regulate your sodium levels to avoid facial bloat and eat volume foods and foods high in fibre to keep satiated in order to maintain this level of body fat because it is by no means easy but that is the cost of leanmaxxing.
Section 5: hardmaxxing
Upper jaw (maxillary osteotomy)

- Significantly receded or protruding upper jaw
- Crossbite
- Too much or too little of the teeth showing
- Open bite
- Reduced facial growth of the middle of the face (midfacial hypoplasia)
An open bite occurs when excess bone grows above the molars, causing what's normally a flat, even surface to become angled. To fix this, your surgeon shaves away or removes the excess bone.
Once the jaw is realigned, plates and screws hold the bone in its new position.
Lower jaw (mandibular osteotomy)

A mandibular osteotomy can correct:
- Receding lower jaw
- Protruding lower jaw
Chin surgery (genioplasty)

A genioplasty can correct a small chin (deficient chin). A small chin often accompanies a severely receded lower jaw.
Typically, surgeons can alter the jaw and restructure the chin during the same surgery. The surgeon cuts a piece of the chin bone on the front of the jaw, moves it forward, and secures it in a new position with plates and screws.
After the procedure
After surgery, your doctor will provide you with instructions. These usually include:- What you can eat
- Oral hygiene
- Avoiding tobacco
- Avoiding strenuous activity
- Medications to control pain
- When to return to work or school, which is usually in one to three weeks
After initial jaw healing — at about six weeks — your orthodontist finishes aligning your teeth with braces. The entire orthodontic process, including surgery and braces, may take several years. Once the braces are removed, retainers to hold tooth position may be used.
The preferred jaw angle has these characteristics: 130° in face profile view, intergonial width similar to facial width, vertical position in frontal view at the oral commissure or at least not below the lower lip, jawline slope in the face frontal view nearly parallel to (with a maximum 15° downward deviation from) a line extending from the lateral canthus to the alare, ascending ramus slope 65°–75° to the Frankfort horizontal, and curvature in the oblique view visible from earlobe to chin and not pointy.
Redirecting
But what if your jaw looks like the example on the left side and you aim for a look like on the right side ?
It turns out that it's necessary to take a look at the underlying scelettal situation. What makes a jaw wide, angular and aesthetic from the front are mainly:
- Width and shape of the jaw angle i.e. shape and thickness of the posterior corpus mandibulae that connects to the ramus
- Position and size of the masseter muscle and the medial pterygoid muscle
A narrow, unaesthetic jaw, with blunted, rounded jaw angles, which reeks of micrognathia and other illnesses is often the result of posterior mandibular hypoplasia that is expressed by a severe lack of posterior lateral growth of the corpus mandibulae, malplacement of the ramus or TMJ issues.
When we look at this example, we find relatively normal TMJ to dentoalveolar arch vectors which indicates that this patient has a narrow jaw due to posterior hypoplasia and not because of TMJ problems. This is the most common cause of a rounded jaw:
Red line: The vector
Blue circle: Lack of bony mass
So lets talk about solutions. In my opinion, implants are unfavorable for young patients, silicone because of the infection and erosion risk, medpor because of tissue ingrowth, unsatisfactory ossification, titanium because it doesn't interact with the body AT ALL and can cool down dangerously in cold wheater and HA paste well because it usually looks like shit and has other issues. It's literally bone or death.
The patient above already got a chin wing which mainly increased mid mandibular width, but also some posterior width as shown below:
However, unfortunately, the jaw angles tend to get lost during this procedure as shown below:
Reconstruction and replacement of the jaw angles and masseter muscles is therefore needed as shown in this surgical simulation:

This is the so called side wing. It should add anything between 8 - 14mm bigonial width, reshape and accentuate the jaw angles and reposition the masseter muscles.
However, in some cases this will not be enough, and in some cases an aggressive side wing might produce unfavorable outcomes. In that case, a BSSO can help (narrow jaws are almost always recessed so you'll need this anyways probably)
The red circles show the consequence of ramus widening with a BSSO, around 4 - 6mm per side. Combined with a side wing it could add almost 25mm wigonial width.
There's a guy from jawsurgeryforums who had a chin wing and side wing, plus very little fillers done. This is his before and afters:
If it hadn't been enough, he still could have gotten the BSSO.
To sum this up:
- A narrow jaw with inward tilted jaw angles is best fixed with a chin wing, side wing, BSSO and some fillers on top.
- Young people should stay away from implants.
- And additional information: IMDO doesn't accentuate the jaw angles, it just makes the whole jaw wider which is not desired.
Section 6: neckmaxxing
Jaw Development
One of the characteristics of attractive men is having a muscular and defined Jaw line.
Why is this attractive? For the same reason muscular and proportionate bodies are attractive in men, A muscular jaw and a muscular neck go together. Thus having a sharp jawline and thick neck is an obvious sign of physical vitality and strength.
Men with skinny necks tend to have comparatively weak looking jawlines. There are exceptions perhaps, but overall it is a malnourished look, and even if a man’s jawline is defined, his face looks weak because of the lack of muscle.
Basic Neck Training Anatomy
Now that we’ve talked about WHY you should train your neck, let us get into some practical anatomy and training.
To start with, the neck has over 25 different muscles that attach to it. That is A LOT of muscles. I am not going to name all of them, as it would detract from the point, but be advised that almost all of them are SMALL muscles, and they are not difficult to injure.
The neck has many muscles, but these are not muscles that you can sloppily train. I’ve seen many athletes overdo neck work and be left with strained muscles, a headache, and regret that they didn’t slow their roll and train smarter.
When you do any kind of neck training then, always start conservatively. As you’ll see in the exercise section, I do not advise weighted neck work until you’ve been training your neck regularly with bodyweight movements for at least 4-6 weeks.
That in mind, the easiest way to think about neck training is categorise it into functional directions.
Your neck has 4 basic functions/directions it can move in:
1. Flexion (looks down)-this is tucking your chin to your chest. Many boxers practice neck extension, but its training FLEXION that makes your neck stronger and more resistant to being snapped back by a punch
2. Extension (looks up)-Being able to extend your neck is hugely important in grappling and wrestling of any kind, as you use your neck to resist and move your opponent. The cervical extensor muscles and the trapezius contribute the most to this function
3. Lateral flexion (side to side head tilt)-the lateral flexor muscles on the sides of the neck are quite small, and they are some of the easiest to injure. Always be very conservative training lateral flexion
4. Rotation (turning your head)-Rotation can be trained with bodyweight initially, and there are some new neck training hardnesses on the market that allow for loading rotation in training. At the more advanced level of neck training it is usually done with wrestler’s bridge work. Training rotation is not always necessary, and many athletes find that simplifying do flexion and rotation is sufficient, but it is a movement capacity you can train regardless
For being a fairly short limb then, you realise that your neck has multiple ranges of motion. Any neck exercise you do is going to train one of the above functions.
Training the Neck 101 and 201
Training the follows a simple path of progression
1. At the beginner level, you start with unweighted bodyweight exercises, done for 2-3 sets twice a week
2. After 4-6 weeks, you can start adding weight to your bodyweight movements, and incorporate isometric movements
3. After another 4-6 weeks, or 2-3 months, you’ll have the strength and muscle to do more advanced bodyweight work like wrestlers bridges
Neck training SHOULD always be done for high reps and/or sustained time under tension. Being overly ambitious with your neck training could cause severe and even life-threatening injuries
And keep in mind there is no such thing as heavy neck training
If you have never trained your neck, I would suggest starting with BODYWEIGHT first. Do not attempt any kind of weighted exercises
The Neck and The Yoke
The "Yoke" in the lifting world refers to the neck, traps, and upper back. Even if someone is not that big in sheer size, if they have a thick neck, traps, and upper back, human beings intuitively know that person is physically strong.
This creates a "look of power" that is biologically undeniable.
The Trapezius muscles attach to the base of the skull, and during movements like shrugs, deadlifts, and barbell pulls, the neck has to stabilise isometrically.
Developing the trapezius muscles then can often increase the circumference and thickness of the neck without any direct training of the neck itself
Neck Training Routines
While I list out many different routines below, keep in mind that you can mix and match your neck exercises. There is no set routine you need to do, neck can be train 2-3 times weekly, and you can change the exercises each time
The one “Rule” to follow is to balance out of your neck training with both flexion and extension work. It does not need to be a 1:1 ratio, but you do want a blend of movements. Don’t overdo using a neck harness or doing head extensions and then be surprised when your neck hurts.
The following routines can be done 2-3 times weekly. They run from beginner routines, all the way to advanced routines with harder movements
Basic Neck Training 1: Go To Routine from Josh Bryant
Obviously I know this routine is 100% free on youtube, but I have to share it's an incredible routine. The one caveat to this routine is that the lateral flexion and rotation can actually be too much for people initially. If you’ve got a very stiff neck and tight upper traps, this routine may not be advisable. If you don't though, I’d suggest doing this 2-3 times weekly.
Basic Neck Training 2: Bodyweight Only, Flexion and Extension Only
If you want to train neck every workout, you could do the following.
It's easy to recover from, it's unlikely to lead to neck stiffness, and you’d notice results in a few weeks.
Bodyweight Neck Flexion, 2 sets x 15-30 reps
Bodyweight Head Extensions, 2 sets x 15-30
Basic Neck Training 3: Bodyweight Only Bodyweight
Neck extensions, 2 sets x 15-30 reps
Bodyweight Head Extensions, 2 sets x 15-30
Lateral Neck Flexion, 2 sets x 10-15 reps
Basic Neck Training 4
Swiss Ball Iso-hold Neck Bridge (also called a neck plank) 2-3 sets x 30-60 seconds
Front Bridge Iso-Hold on Bench 2-3 sets x 20-60 seconds
Lateral Neck Flexion, 2 sets x 15-30 reps
Intermediate Neck Training 5
Front Neck Flexion with plate on Forehead 2 sets x 15-25 reps
Head Extension with plate on back of forehead 2 sets x 15- 25 reps
Lateral Neck Flexion, 2 sets x 15-30 reps
Intermediate Neck Training 6
Front Neck Flexion with plate on Forehead 2 sets x 15-25 reps
Neck Harness 2 sets x 15-25 reps
Banded Lateral Neck Flexion 2-3 sets x 10-15 reps
DB Shrugs 2 sets x 25-30 reps
Weighted Neck Workout 7
Front Neck Flexion with plate on Forehead 2-3 sets x 15-25 reps
Neck Harness Extension 2-3 sets x 15-25 reps
DB Shrugs 2-3 sets x 25-30 reps
Neck Training: Bridging
Some coaches will advise you to never do neck bridges, while others will swear by them. I would advise caution. If you can get your neck muscular doing the above routines and are satisfied with your results, then maintain doing what works.
Bridge Workout 8
Back Neck Bridge 2-3 sets x 60-120 seconds
Front Neck Bridge 2-3 sets x 60-120 seconds
Neck Training Routines on Youtube
Ross Enamait
No Equipment Neck Training
The only book with a chapter on neck training https://www.amazon.com/Jailhouse-Strong-Josh-Bryant-ebook/dp/B00FJHWFHK Learn the head nod exercise popularized...The Top 8 Neck Exercises
I have listed this out from the most basic, to harder exercises that require more training, and movements that require some equipment. This is not a comprehensive list, but it is the most tried and proven exercises.
1. Head Nods/Chin tucks-Forward Flexion
This is a staple training technique of Brazilian Jiu-Jitsu, Judokas, and boxers. You can do this on a mat or, laying on your back with your head hanging off the end of a bench. Lift your head and bring your chin to your chest for a set of 15-25 reps. 2-3 sets is the best recommendation.
This movement can obviously be done weighted, typically by using a plate placed on the forehead (and padded with a towel). The weighted version follows the same set and reps as the unweighted version.
2. Head Extensions
This is the reverse of the head nod. These are best done with chest down on a bench, with your head hanging off the end off the end. You drop the head down towards the floor, and then extend the neck and look up. When doing these, it is important to not extend too far back and compress the cervical spine. These are done slow and control, and not with momentum. Like the front flexion, these are for a set of 15-25 reps. 2-3 sets is the best recommendation.
This movement can also be done weighted, typically by using a plate placed on the back of the head and held in place with the hands (and padded with a towel). The weighted version follows the same set and reps as the unweighted version.
3. Lateral Head Flexion
This is a popular movement, but in my experience it leads to a lot of cramped necks and spasms. You have to be very conservative the first time you do this exercise. If you are going to do these, do them with bodyweight only. They are best done for a set of 15-25 reps. 2-3 sets is the best recommendation.
4. Head Rotation
This is an overlooked exercise, but so simple and effective. You hang your head off the end of the bench, and fully rotate your neck to the right, and then to left, and then repeat that going back and forth. Basically you look right, look left, back and forth, back and forth. These are best done for high reps in the 20-40 range (per side). If you have a specialised neck harness, these can be done standing and with resistance, but there is no effective way to add resistance to the bodyweight version on the bench. Stick with the high rep work
5. A Neck Harness
Neck Harnesses are RARELY seen in modern gyms, but they WORK. I have one and I have used religiously in the past. DO NOT buy a cheap neck harness. I've had my Spud harness for 5 years now, it's built to last. A cheapy neck harness that snaps is an accident waiting to happen. With a neck harness, you will place it securely around the skull, and sit upright, your hands placed on your knees. String a weight plate through the neck harness chain, and extend the head up. Lower into slight flexion, then back up again. This movement should be performed with a controlled tempo and done for high reps. Add weight as appropriate. 2 sets of 20-30 reps twice a week is a good starting point
6. Walk Tall
Josh Bryant popularised this movement (Bryant is the great coach and writer of Jailhouse Strong)
In a Walk Tall, you use a head strap of some kind, I personally have used a hanging ab strap, and you attach it to an elastic band or cable stack. You then walk forward and walk backwards. This is done with tension/weight of course. This is an isometric contraction can also be done sideways and backwards as well. This allows you to strengthen the neck from all four directions. You would do for 30-60 seconds in each direction, 1-2 times.
7. Stability Ball or Bench Neck Bridge (Neck Plank)
This exercise is a regressed version of the neck bridge. The stability ball offsets some of your bodyweight while also providing a more comfortable and accommodating surface to bridge from versus the floor or a bench. An advantage that this has the over the floor is that you can safely perform neck roll movements without fear of injury. Perform for 2-3 sets of 30-60 seconds.
8. Wrestlers Bridge
Bridging is a controversial exercise. While its universally practiced by wrestlers, and wrestlers have the thickest necks of any athletes, it also tends to be very very aggravating orthopedically, and wrestlers also tend to have chronic neck problems as they age. If you want to incorporate into your training, you absolutely can, but if you don’t want to include it, that is fine too. Ultimately we all exercise at our own risk. At the level of doing bridges, 2-3 sets, working both the front and back of the neck, would be effective. If you want to do more advanced movements though, go for it.
9. A Neck Machine (IF you can find one)
They are the most all around effective piece of equipment you can use. The downside is that they are very very rare. Only the most old school and hardcore of gyms will ever have a 4-Way Neck machine. If you do come across one, they are definitely worth using though. 2-4 sets, 10-20 reps each direction, done twice weekly.
section 7: bonesmashing
Bonesmashing works, if you listen to videos of surgeon being interviewed on the subject they don't deny it works. They say its dangerous and that the result can easily look terrible.
You can easily destroy your collagen, get uneven growth, mistake swelling for gains, get scar tissue, look like a freak, etc.
So how do we get bone growth without all these underisable side effects? I think Ive found a way and I am going to test it for the next year and see if I get any improvement, will come back to share ofc.
Disclaimer:
you will not get the same result as implant with this method, if you have the means and want rapid improvement, get surgery. I devised this method to induce growth AND preserve/improve the health of my skin and bones. So this is 50/50 for facial development and anti aging. I don't expect much growth in a year, I see this as a way to improve my face in the long run.
The logic:
-Shin conditioning, which increase bone mineral density and size(girth) over time is done in many ways: jogging, kicking heavy bags and shin rolling. They all work to create micro fractures in the bones.
-Amongst these method only shin rolling can be applied to the face. So instead of hitting the bone, we can apply pressure to the bones on our face therefor reducing swelling and since the movement is continuous across the bone, we can expect the result to be more consistent across the bone itself.
-A moisturizing cream can be used before each session to further reduce damage to the skin.
-Bone supporting supplements ; mag,zinc,calcium,k2,d3 should be taken at high dosses to ensure the body as the required nutriment to repair and grow bones.
-A pulsed electromagnetic field (PEMF) device can help build bones. Multiple studies have proved that it is a way to help osteoporosis by increasing bone mineral density and osteoblast, which is the process by which the body builds/grow bones.
- Using a PEMF device, which is very safe, as much as possible and especially after a bonesmashing session will most probably speed up the process of bone growth.
The tools
-Moisturizing cream.
-Bone supporting supplements.
-Gua sha set
Method
-Apply moisturizing cream at least 5 minute before bonesmashing session.
-Apply pressure to the zygomatic bone, undereye, zygomatic arch and half of the jaw starting from the gonions. Apply continuous pressure for a set period of time, equal for each side of the face both in length of time and pressure. Use the gua sha stone or roller depending on the bone. Both can do the job. Its up to you.
-Take bone supporting supplement as follow
-Calcium 1500mg/day
-K2 1mg/day
-Zing 50mg/day
-Mag 500mg(elemental)/day
-d3 20000 iu/day
-Use PEMF face mask at least 30min per day, once I receive it I will see if I can comfortable sleep with it.
Benefits:
Obviously bone growth is the main goal of this method, but there are other benefits to using a PEMF machine:
- increases micro-circulation
- reduces inflammation and pain
- reduces fine lines and wrinkles
- increases absorption of skin-care products
- improves tensile strength of the skin
- enhances collagen production in the skin
- increases bone density
Section 8: conclusion
this thread has taken me 2 full long days to make to find all the info and pics it was really a hassle. i wanted to make my last post/thread really long and detailed and hope everyone ascends because of it. i really had fun here with all the people i met here sadly i will not be an active member anymore, unfortunately i have no reason to be here i have already ascended and "glowed up" ofc ill come by once and a while and check up but i will not be as active as i was before. i hope everyone ascends from the threads i have created and just in general. goodbye
pinging people that might want to read this megathread
@Nihilus @tvhd @DonsaMogger @F.5ancy @Dean @Yeyi @Looksmaxlossus @Looksmaxxer69
@Dean
sticky thread?
Last edited:


